%20--%3e%3cdefs%3e%3cstyle%3e%20.st0%20{%20fill:%20%23061b40;%20}%20.st1%20{%20fill:%20%23306af1;%20}%20.st2%20{%20fill:%20%235ce5cf;%20}%20%3c/style%3e%3c/defs%3e%3cg%3e%3cpath%20class='st0'%20d='M55,10.5h9v3h-9v9h12V7.5h-12v3ZM64,19.5h-6v-3h6v3Z'/%3e%3cpolygon%20class='st0'%20points='69%2016.5%2078%2016.5%2078%2019.5%2069%2019.5%2069%2022.5%2081%2022.5%2081%2013.5%2072%2013.5%2072%2010.5%2081%2010.5%2081%207.5%2069%207.5%2069%2016.5'/%3e%3cpolygon%20class='st0'%20points='95%2010.5%2095%207.5%2083%207.5%2083%2022.5%2095%2022.5%2095%2019.5%2086%2019.5%2086%2016.5%2095%2016.5%2095%2013.5%2086%2013.5%2086%2010.5%2095%2010.5'/%3e%3cpath%20class='st0'%20d='M40,1.5v21h11.6l1.4-1.4v-7.6h0c0,0-1.4-1.5-1.4-1.5l1.4-1.4V2.9l-1.4-1.4h-11.6ZM50,19.5h-7v-6h7v6ZM50,10.5h-7v-6h7v6Z'/%3e%3c/g%3e%3cpath%20class='st1'%20d='M23.1,24L14.7,4.8l-4.9,11.2h3.8l-1.8,4H3.3L12.1,0H2C.9,0,0,.9,0,2v20c0,1.1.9,2,2,2h21.1Z'/%3e%3cpath%20class='st2'%20d='M34,0h-16.8l10.6,24h6.2c1.1,0,2-.9,2-2V2C36,.9,35.1,0,34,0ZM32.5,20h-4V4h4v16Z'/%3e%3c/svg%3e)

Postbot 3000
Overview :
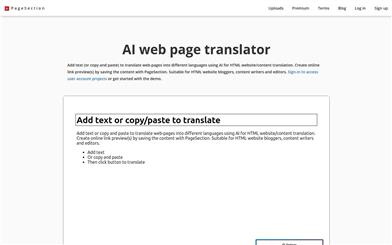
PostBot 3000 is an open-source project showcasing how to build a powerful AI agent that streams responses and generates artifacts. The project leverages LangGraph Python for AI workflows and utilizes FastAPI to create a robust API. It incorporates multiple tech stacks, including LangGraph, Vercel AI SDK, gpt-4o-mini, FastAPI, Next.js, and TailwindCSS. The open-source nature of PostBot 3000 makes it easier for anyone looking to implement similar solutions for development and deployment.
Target Users :
Target Audience: Developers, AI researchers, and tech enthusiasts interested in building AI agents. PostBot 3000 provides a complete open-source solution that allows these users to quickly get started and implement their own AI agent projects.
Use Cases
Developers use PostBot 3000 to build their own AI agents for automated content generation.
AI researchers utilize PostBot 3000 for research and experimentation in AI workflows.
Tech enthusiasts learn how to deploy and maintain AI agent services using PostBot 3000.
Features
Open-source code: Both agent-ui and agent-service code are open-source on GitHub.
Streaming artifacts: Content generated by the agent can be streamed in Artifacts.
Build AI workflows using LangGraph Python.
Create robust APIs with FastAPI.
Support for multiple tech stacks including Next.js, TailwindCSS, and more.
Supports deployment on Heroku.
Community engagement and support allow developers to share experiences in building AI agents.
How to Use
1. Clone the repository: Use the git clone command to clone the PostBot 3000 GitHub repository.
%20--%3e%3cdefs%3e%3cstyle%3e%20.st0%20{%20fill:%20%230080ff;%20}%20%3c/style%3e%3c/defs%3e%3cpath%20class='st0'%20d='M16.2,11.1c.4.5.4,1.2,0,1.8l-4.7,7.1h-3.8l5.3-8L7.6,4h3.8l4.7,7.1Z'/%3e%3c/svg%3e)
2. Create an environment file: Create a .env file based on the .env.example file, and add your API in the agent-service and agent-ui directories.
3. Install agent-service dependencies: Navigate to the agent-service directory and run poetry install to install the dependencies.
4. Run agent-service development server: Start the service using the command poetry run uvicorn app.main:app --reload.
5. Install agent-ui dependencies: Navigate to the agent-ui directory and run npm install, yarn install, or pnpm install to install the dependencies.
6. Run agent-ui development server: Start the frontend development server using npm run dev, yarn dev, or pnpm dev.
7. Open your browser: Navigate to http://localhost:3000 to view the results.


Featured AI Tools
Chinese Picks
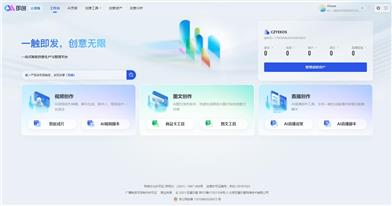
Douyin Jicuo
Jicuo Workspace is an all-in-one intelligent creative production and management platform. It integrates various creative tools like video, text, and live streaming creation. Through the power of AI, it can significantly increase creative efficiency. Key features and advantages include:
1. **Video Creation:** Built-in AI video creation tools support intelligent scripting, digital human characters, and one-click video generation, allowing for the rapid creation of high-quality video content.
2. **Text Creation:** Provides intelligent text and product image generation tools, enabling the quick production of WeChat articles, product details, and other text-based content.
3. **Live Streaming Creation:** Supports AI-powered live streaming backgrounds and scripts, making it easy to create live streaming content for platforms like Douyin and Kuaishou. Jicuo is positioned as a creative assistant for newcomers and creative professionals, providing comprehensive creative production services at a reasonable price.
AI design tools
105.1M
English Picks
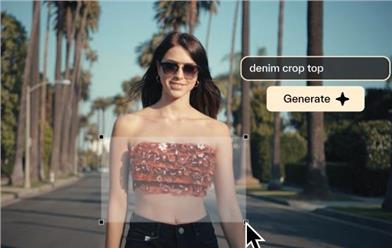
Pika
Pika is a video production platform where users can upload their creative ideas, and Pika will automatically generate corresponding videos. Its main features include: support for various creative idea inputs (text, sketches, audio), professional video effects, and a simple and user-friendly interface. The platform operates on a free trial model, targeting creatives and video enthusiasts.
Video Production
17.6M